Tuesday, October 29, 2013

Shoo (Cream Puff Pastry aka Pâte à Choux)

Shoo is very popular in Georgia. The pasty is very light, airy, and you can't help to eat more than one at a time. As promised, here is the recipe. This recipe makes 7-8 pieces.

Ingredients
Batter
  • 1/2 cup of water
  • 50 grams of butter
  • 1/2 cup flour
  • 2-3 eggs
Cream (In Georgia we call this type of cream a 'boiled cream')
  • 2 cups of milk
  • 1/2 cup flour
  • Less than 1/2 cup sugar
  • 2/3 stick of butter
  • Vanilla
Ganache (optional)
  • 3 tbs cocoa
  • 5 tbs milk
  • 1/4 cup of sugar
  • 1/3 stick of butter
Preparations
Batter: Boil the water in a pot and add the butter. After butter is melted set the heat to low and gradually add flour and stir. Remove the dough from the heat and start adding eggs, one at a time, while vigorously stirring the dough quickly with a wooden spoon (See the image below). When you add the first egg the batter might separate in chunks but it will come together after the stirring. The consistency needs to be thick so that when you scoop it out on a cooking sheet it stays firm.


Pre-heat the oven to 350F. Start scooping out the batter using a large spoon and placing it on a cookie sheet as shown in the image below. Shoo should be done when the dough turns a golden color, about 30 minutes.

Boiled Cream: Place the milk in a pot on a medium heat. After the milk is warm (before it starts to boil) start adding flour and sugar mixture slowly and mix it constantly with a whisk. After all the flour and sugar is mixed, let it simmer for 5 minutes. You will know if it's done when the flour taste has left the cream. Next, poor the cream in a different container and let it cool completely. You may put it in the fridge but make sure to stir once in a while to prevent clumping.

After the cream has cooled completely begin whipping the butter (soft, at room temperature). Add the boiled cream, little by little, until it's all mixed, then add vanilla. The cream should come out very fluffy.

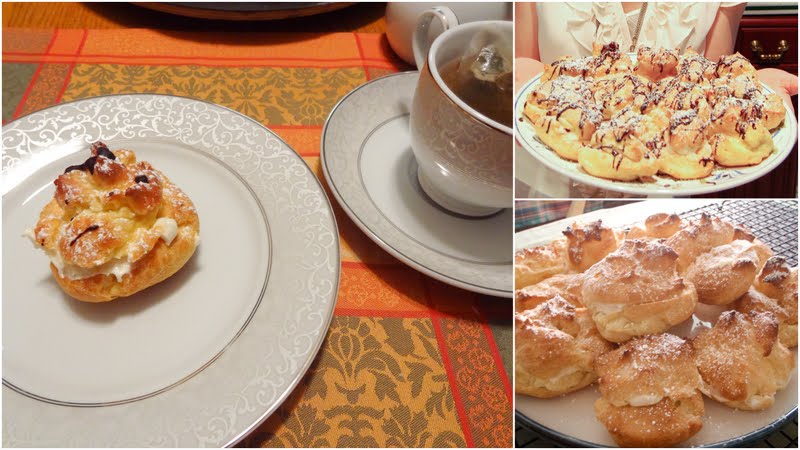
After Shoo is completely cooled, start preparing it to add the filling. Use a knife and slice the shoo in half without going all the way through, then fill the opening with a cream (see the image below). After you filled all the shoo take the powdered sugar and ganache and decorate the shoo before serving.


Ganache (optional): Take a small pan and mix coco powder with sugar. Add milk and put it on medium heat. After it boils let is simmer and add butter. Let is simmer 3-5 minutes until it thickens. You can drizzle the ganache on the assembled shoo and then sprinkle on powder sugar. Enjoy!

Wednesday, October 23, 2013

Grilled Salmon with Wild Rice and Asparagus

We are enjoying our charcoal grill so far and we use it almost every weekend. This time we purchased salmon from Market Street and grilled the filets on a cedar plank. First, we soaked the cedar in red wine and water for two hours. The salmon was seasoned with salt and pepper then placed on the cedar plank and onto the grill. The coals were set at the lowest position. The salmon was cooked until it just began pulling apart, but not so long as to dry out the meat. The cooked salmon had a wonderful flavor, and infusion of the wine, cedar, and the salmon's natural oils.


Wednesday, September 25, 2013

Fresh Fruit Kampot

Growing up in Georgia, we didn't go to the supermarket to buy juice. Instead, my mom would make it at home. It's so easy to make fresh fruit juice at home and avoid the store-bought juices full of preservatives, flavoring, coloring and other ingredients!

After picking fresh blackberries, peaches and strawberries from the farm, we decided to make kampot. First, we washed the fruit. Some of the peaches were sliced while others were left whole. We placed the fruit in a large pot, added water, let it come to a boil on medium heat, then let it simmer for about 10-15 minutes until the fruit was softened considerably. Lastly, we added sugar to taste. After cooling to room temperature, it was ready to enjoy! I usually love warm kampot, but cold is just as good. Some people strain the kampot before serving, but I love the fruit that remains at the bottom of the glass.

There is nothing fresher and healthier to give your children than homemade kampot! My favorite kampot is made with concord grapes--amazeballs! Unfortunately, we can't seem to find concords in Dallas. You can try making kampot with your favorite combination of fruit. Enjoy!


Wednesday, September 18, 2013

Medoki - Georgian Pastry


This is my most favorite Georgian desert! It's airy, soft, and out of this world. It resembles layered graham cracker cake filled with a soft cream that melts in your mouth. The recipe is not difficult to follow if you are careful and attentive to details. I included step-by-step pictures to guide you trough the process. I love this pastry so much that I requested to have Medoki at my Georgian wedding as one of the deserts. Unfortunately, I was turned down by my cousin who vehemently opposed my request on the grounds that Medoki was "out of fashion" in 2010. Yeah, in Georgia, desserts can go out of fashion! Oh well, I learned how to make it so I can have it anytime I want :) Ya'll ready for this? Here it goes....

Ingredients
Batter
  • 3 eggs
  • 1 1/2 cups of sugar
  • 1/2 tsp baking powder and 1/2 tsp baking soda
  • 3 tbsp honey
  • 1 stick (1/2 cup) of butter
  • 3 cups of flour (more or less)
Cream
  • 4 Sticks of butter
  • 1 1/2 cans of condensed milk 
  • Vanilla
Preparation
Batter: The batter needs to be prepared on a double boiler. The top pot can be metal, glass or ceramic. Start boiling the water in a pot then place the second pot on top. Add eggs and sugar and start mixing with a wooden spoon. After sugar is melted, add baking powder and baking soda. Next, add honey and butter. Every five minutes mix this batter with wooden spoon until the batter turns light brown, about 30-40 minutes. See Figure 1 below.

>Figure 1: Making the batter.

After the batter has turned light brown, turn off the heat. Then, in the same container, add flour slowly and mix. Divide the batter into 6 parts. Each part should be about size of your fist. See Figure 2, top right corner. Begin rolling out the dough on a mat sprinkled with flour. Each sheet of dough should be paper thin, so stretch it well. See Figure 2, bottom row.

Pre-heat the oven to 400 F. Place the first sheet of dough onto a baking pan and cook until the dough turns dark brown, about 3 minutes. The dough will burn easily because it's so thin, so pay close attention to the cooking process. Repeat the latter steps for the remaining five sheets of dough. Lay out the finished sheets of dough to cool.


Figure 2: Rolling and stretching the dough.

The pastries sheets are not perfectly square when removed from the oven. Trim the edges of each sheet, removing as possible, to make each sheet into uniformly sized rectangles.  Use this first sheet as a template for your next 5 sheets. Crush the pastry trimmings to make crumbs for later use. See Figure 3 below.

Figure 3: Trimming the edges of the cooked sheets and making the crumbs with left over trims.

Cream: Whip the butter well using a mixer, then slowly add condensed milk until the cream is fluffy. Add vanilla.  If the cream becomes too thin, put it in the fridge for few minutes and bring it back out and mix again. See Figure 4.

Figure 4: Preparing cream and then assembling the Medoki.

The final step is to assemble all the pieces. Add the cream to all 6 sheets and start spreading it evenly, being careful not break the sheets. Then, stack all sheets on top of each other. Add cream to the top piece then sprinkle on the trimming crumbs  to cover the pastry completely. Enjoy! 

Friday, August 16, 2013

Simple Pasta with Poultry Sausage and Asparagus

On Sundays we make a big meal and eat it throughout the week. However, by the middle of the week, we usually have run out or prefer making something different to change things up a bit. I created this quick pasta recipe and it became our favorite pasta dish.  I used whole wheat pasta, poultry sausage, plum tomatoes, and asparagus. First, I cooked the sausages in a covered pot with little bit of water. Once they were cooked and the water was evaporated, I added olive oil and pan fried the sausage with onions. I then added fresh plum tomatoes, and asparagus and simmered it together. Finally chopped garlic, cilantro, and parsley were added, with salt and pepper to taste. Simple, quick, and delicious!


Thursday, August 8, 2013

East Side King @ Liberty Bar, Austin TX

After being in Dallas for six months, we finally made a trip to Austin, an easy four hour drive (short for Texas). Austin is such a free-spirited place, which seems odd for the Texan capitol. We think Dallas needs to lighten up a bit and take a note from Austin. What an unique culture! Most importantly, the food experience was incredible. I don't have time to talk about all of the places we ate at, but this one food truck was very memorable. Our friend Lindsey, who lives and breathes Austin culture, took us to Liberty Bar where they have an East Side King food truck parked in the back patio. I still miss their pan fried brussels sprouts which was amazing!

We ordered and shared Poor Qui’s Buns (roasted pork belly in steamed buns, hoisin sauce, cucumber kimchi, and green onion), Fried Brussels Sprouts ( in a sweet-spicy sauce, shredded cabbage, alfalfa sprouts, basil, cilantro, mint, onion, jalapeño), and Thai Chicken Karaage (deep-fried chicken thigh, sweet-spicy sauce, fresh basil, cilantro, mint, onion, jalapeño). Everything was deliciously mouth watering. Can't wait to go back there again!


Wednesday, August 7, 2013

Ham Orchards, Terrell TX

Our friend told us about this peach farm in Terrell, TX. We were so excited to take a trip there. It was only an hour drive from our place. The town of Terrell is nothing special except the fact that Jamie Fox was born there and they have a large mental institution :)

You can visit the Ham Orchards website at http://hamorchard.com for more information. They operate from mid May - Mid August so check the times before you go. They have over 30 varieties of peaches that are grown from May-August. Their store also has many other fruits, preserves, pies, ice ream and other goodness that you can purchase. We bought whole fig preserves which was really good! Another fun thing you can do is pick your own blackberries. And, of course, we had to sample the BBQ shack next to the store, even though we already had lunch!


Friday, June 14, 2013

Lobster Under the Umbrella

Brian was adamant about getting the grill out this week. I wasn't in the mood for a big honkin' steak or sausage, or the usual fare. We settled on grilled portabella mushrooms. We did our usual Saturday grocery shopping at Whole Foods. We picked up two medium size mushrooms then headed over to the fish counter. Brian still had his heart set on grilling some kind of meat. He was thinking of doing up a whole fish (not sure how that would go with the mushrooms), but after passing by the fish counter we saw large lobster tails were on sale. SCORE! Our cart welcomed the addition of two beautiful lobster tails. We were so excited for what we were about to make that, on the way home, I came up with the name Lobster Under the Umbrella because I told Brian to put the lobster under the mushroom :) Also, Georgians have a tradition of giving food names seeming unrelated to what they describe.

We really didn't have a set recipe until it was ready to go on the grill. The recipe is simple and you can put your own twist to it. First, we marinaded the mushroom in a mixture of apple cider vinegar, EVOO, italian herbs, and pepper. The lobster tails were cut in half and laid on plate, left to marinade in the fridge under EVOO, pressed garlic, lemon zest and pepper. There wasn't much time between when we returned from the store and when we wanted to start cooking. Both marinated for about two hours.

Further ingredient were prepared: sliced tomatoes, chopped parsley and cilantro, chopped red onion, grated fontina cheese, and sliced fresh mozzarella. Two pieces of whole wheat bread were buttered and set aside to make grilled toast.

On the side, Brian prepared his famous roasted rosemary potatoes. Quartered red potatoes were coated in a mixture of ground fennel seed, rosemary, salt and pepper, EVOO, and pressed garlic, then set into a 12 inch caste iron skillet.


The charcoal grill was prepared (lump charcoal, not bricquettes!). After heated, the potatoes were placed on first in the skillet over moderately direct heat. They took the longest to cook. After a while the lobster were placed directly on the grates over direct heat, shell side down (the coals were as far from the grates as possible to avoid burning the meat). After three or four minutes, the tails were flipped and chared on the meat side. They were then removed. The meat from one tail was removed from the shell and chopped. The meat from the other tail was removed and cut into four two inch strips.  The mushrooms were then placed directly on the iron grates and cooked on both sides until al dente.

The cooked mushrooms were placed into two eight inch iron skillets, then layered first with a slice of mozzarella, two tomato slices, chopped lobster, grated fontina cheese, onions, herbs, and FINALLY, the whole slices of lobster. All three skillets were left on the grill to slowly roast in the smoke filled drum! Oh, I forgot to mention, I drizzled clarified butter over everything! Just a bit, though, for flavor :-)

After everything was finished cooking, the skillets were removed. The mushroom skillets were garnished with fresh herbs and grilled bread. The roasted potatoes were served on the side.

Very niiiice!


Thursday, May 30, 2013

Shrimp and Scallop Stir-Fry

It's always fun to make a stir-fry. My favorite part is that I get to clear my fridge by using as much vegetables I can find. You can really make a unique dish every time. It always feels refreshing biting on a crunchy vegetables. This time we invaded our friend's kitchen and cooked this delicious shrimp and scallop stir-fry with fried brown rice. Our vegetables of choice were mushrooms (baby bella, shiitake, and oyster), baby corn, snow pees, onions, and scallions.


And voilà


The dinner is never complete without a desert, so we made Shoo! I promise to post the recipe soon.


Thursday, May 2, 2013

Quail

Quail has always had a special place in my heart. In Georgia, during the hunting season, my friend used to bring me a bunch of birds and we would pan fry them. We have a great quail dish in Georgia that you can order in restaurants which is cooked in a clay pot with tomatoes (see the image below). The image of a live quail is from a village where my relative was breeding them.


We were able to buy frozen quail in the market. We marinated the quail (deboned) in vinegar, onion, olive oil and pan fried it in cast iron skillet with fresh tomatoes, wine, and fresh cilantro. We served it with buckwheat on the side. 


Thursday, April 25, 2013

Limoncello Recipe

Someone once said, "when life gives Italians lemons, then make Limoncello". Our first experience with this amazing lemon liqueur was during our honeymoon in Italy. Cold, sweet, fragrant, and citrusy goodness gently flowing down your throat and warming your body. After we got back to the US and finished our supply of Limoncello, we decided to make our own at home. You'll need three ingredients: lemons (preferably organic, and more preferably, Italian), grain alcohol (or rectified spirits), and sugar. This can't get any easier. And then all you need is patience and love. Since you can't easily find Italian lemons in the US, make sure to get organic lemons since you will be infusing the zest and you don't want any chemically treated lemons.


Ingredients
  • Zest of 14 organic lemons
  • 750 ml grain alcohol or rectified spirits (at least 190 proof)
  • 375 g sugar
  • 1 L water
Preparation
Make sure to wash the lemons well. When you are zesting, make sure not to get any white pith because the end result will be bitter. Take the zest and place it in a glass bottle, followed by the alcohol. Seal the bottle as tightly as possible to prevent any alcohol from evaporating. Let the alcohol infuse for at least one month.

PS. When life gives you leftover lemons, MAKE LEMONADE!

Next, strain the zest from the alcohol through a coffee filter or other fine strainer. In a separate pot, boil the water and add the sugar to make a simple syrup. Let the syrup cool then add it to the alcohol. You will know right away if you performed the tasks correctly. The previously translucent yellow alcohol will immediately become a pale yellow opaque liquid upon adding the syrup. See Steps 3 and 4 in the image below for an illustration of this process. We like to leave the final product in the freezer so it will last as long as possible. Drink responsibly and enjoy!

Tuesday, April 23, 2013

Beef Stew with Vegetables

This recipe was adapted from a stew in James Beard's American Cookery. The stew incorporates black beans turnips, pearl onions, leeks, green beans, potatoes, and parsley. We added Madeira to the stew which added a very unique flavor.


We made strawberry and pineapple angel food cake for desert which is super easy to make. We bought the angel food cake and pimped it out at home. You'll need to slice the cake in two, which is very easy with a knife. In the meantime, marinate the fresh strawberries in sugar and liquor for couple of hours until the sugar is completely dissolved.  Spoon the leftover juice over each half of the cake (see bottom left of image below). Next, we made a Georgian cream for the filling. We placed the crushed pineapples in the center and decorated the top with strawberries.


Thursday, April 18, 2013

Grimaldi's Coal Brick-Oven Pizzeria

We were looking for a good pizza parlor in Dallas and came across this place. They claimed to have the best wood grill pizza in town so we gave it a try. You can choose from many toppings and add as many as you like. We ordered a pizza with onions and anchovies. The standard ingredients were fresh mozzarella and tomato sauce. The anchovies were a little too salty, which I guess you'd expect considering how they are generally preserved in packaging, but the rest was delicious. The crust was thin and crispy, just the way we like it. The restaurant is at Watters Creek in Allen, which has lot of shopping and restaurants. They also have many events, such as concerts and festivals on the lawn. It's a great place to bring your family and enjoy the festivities.


Wednesday, April 17, 2013

Sea Breeze Fish Market and Grill, Plano TX

This was an absolutely delightful restaurant! Their seafood comes directly from the East, West, and Gulf coasts and is never frozen. The atmosphere in the restaurant is casual and it's clean, but it certainly presents a strong fish smell upon entry, akin to being in a fish market. They also have fresh fish available for purchase from behind a counter. The food we ordered was amazing! I had a cup of lobster bisque, which I strongly recommend, and Brian had seafood gumbo. My main entree was the popular lobster roll and Brian's was the salmon burger with Asian purple-cabbage slaw on the side. Both were quite tasty. 


Monday, April 8, 2013

Blinchiki Stuffed with Meat

This appetizer is common in Georgian cuisine and is also popular in other Eastern European countries.  I'm not sure of the origin of blinchiki aka blini aka blintzes, or why in Georgia we called it Sultan's blinchiki. Anyhow, blinchiki refers to the type of dough that will be stuffed and is similar to that of a crepe.

Ingredients
Blinchiki (dough)
  • 2 cups of water
  • 2 eggs
  • Pinch of salt
  • Flour
  • 1tbs olive oil
Filling
  • 1 pound of ground or mix of pork, beef, or veal
  • 1 whole onion
  • Parsley
  • Olive oil
  • Black pepper 
  • Salt
Preparation
Blinchiki: Mix eggs and water together. Add pinch of salt, then slowly add flour so that consistency is like a butter milk or lighter.  Add hot olive oil to the mixture and mix it very fast to avoid flour clogs.

Use a nonstick pan on medium to high heat. Poor 1/3 cup of blinchiki batter to cover the bottom of the pan then poor the excess batter back into the batter bowl (Figure 1). It takes about a minute for the dough to turn golden brown on one side. Carefully remove the dough and start your next one.


Filling: Cook the ground meat in a covered pan with a little water. In a separate pan, saute the onions in olive oil and then add the cooked meat and saute together for about 5 minutes. Add salt and black pepper to taste. Last, add the minced parsley. Now you are ready to start stuffing and wrapping the blinchiki.

Take the cooked (golden) side of the blinchiki and add 1tbs full of stuffing and start wrapping.  After you are finished you can save them in the refrigerator or in the freezer (Figure 2). When ready to serve, pan fry each side till golden.


Figure 2: Stuffing and pan frying the blinchiki.

Wednesday, April 3, 2013

Shashliki aka Shish Kebab

Who doesn't love shashliki? Especially growing up in Georgia, shashliki was a special treat served at certain celebrations. You can smell it cooking from miles away. Shashliki refers to skewered meat slow roasted over charcoal. The meat can be lamb, pork or beef, and it's marinated overnight in vinegar, onions, and black pepper.  Brian tried to make shashliki on our charcoal grill using pork tenderloin. The taste was not the same because Georgian pork is usually fattier and tastier than what they sell in the market here in the US, but it was still YUMMY!


In addition, we fire-roasted potatoes in foil, which is, BTW, to dye for. When I was a kid we used to steal potatoes from our house and throw them in a bond fire and eat them after they were done with salt. The potatoes get very smoky and they are delicious! The meal was completed with a fresh cucumber, tomato and dill salad.


Thursday, March 21, 2013

Bouillabaisse

As I mentioned many many times, my mother is a superb cook. She can make a large pot of soup in less than half hour, while making other things simultaneously. She is a great multitasker when it comes to cooking, but she tends to accumulate piles and piles of dishes that I have to clean up. Brian and I like to clean up as we go, but that's not the case with my mom! Regardless, she is the best and I have a lot of learning to do from her. Anyhow, this time, mom made this yummy bouillabaisse.


For desert, mom made a delicious Georgian pastry called White Bear. It's a three layered pasty with strawberries, raisin and walnuts (you can substitute different fruits, such as peaches and apricots).  There is nothing comparable to Georgian pastries in the US. The type of cream used in the filling loosely translates to "boiled cream" in English. It's made with milk, flower, butter, and vanilla. The White Bear is dense but soft and fluffy at the same time.


Wednesday, March 13, 2013

Brian's Homemade Chicken Soup

Today, Brian made this yummy chicken soup from scratch. He likes to make his own chicken stock the night before and finish up the next day. Growing up, I was used to having potatoes in my chicken soup, but Brian likes to use parsnips (and sometimes turnips) instead. I think it's a good idea since potatoes crumble and are starchy. Nothing is better than coming home and indulging on a bowl of homemade chicken soup after a cold day.

Friday, March 8, 2013

Roasted Bone Marrow

Dogs like bones. We do to. Bone marrow is the elixir of life. Humans evolved large brains in part by adding bone marrow to their diet, it has remained an important part in many cuisines ever since. Bone marrow has a simple, but tricky preparation. The bones (beef) must first be washed thoroughly. They are then placed in a baking pan and lightly seasoned with salt, pepper and EVOO. Cooking time is short, somewhere around 15 minutes at 450 degrees, but don't quote me on that.

The real trick to is to remove the bones from the oven before the marrow completely melts away. That's the danger. When you lift the bones from the pan, if the marrow stays in the bone, you're doing okay.

The next tricky part is actually eating the marrow. We like to spread the marrow on toast with some herbs and EVOO. However, we didn't have spoons narrow enough to fit in the bone, so we poked it out with chop sticks! Mmmmmm.

This meal was served as an appetizer to salmon, kale, and brown rice. 


Saturday, March 2, 2013

Mom's Georgian Tolma

I previously posted a little blurb about my mom's Georgian Tolma (which resembles Turkish dolma) and I finally got a chance to make it. So, without further ado, let's begin.

Serves about 8 (depending on how much people eat).

Ingredients
Vegetables you can stuff
  • Sweet peppers (any color you like, mom usually gets red and green)
  • Small cabbage leaves
  • Small collard green leaves (if you have large leaves you can cut them down to size)
  • Eggplants 
  • Tomatoes (pulp removed)
Filling
  • 1 pound of ground beef or 1/2 ground beef and 1/2 ground pork
  • Tomato pulp
  • Finely minced: onion, garlic, cilantro, parsley, and basil
  • 1/3 cup uncooked rice 
Stock
  • 1 box (1 quart) of chicken broth or boiled water
  • 1/2  onion, chopped
  • 1/2 cup of tomatoes, chopped
  • 1 tsp tomato paste (optional, it will make the color richer)
  • Salt to taste
Preparing vegetables to be stuffed
First, you will need to soften the cabbage leaves and collard greens in boiling water so that they are easy to roll when stuffed.
  • Blanch 10 cabbage leaves at a time in boiling water until soft enough to form into rolls (about 5 minutes). Trim the thick portion of the stem (but do not remove completely) so that the leaf is easier to roll (see Figure 1).
  • Blanch 10 collard green leaves as you did the cabbage leaves, but this time it should take less than 5 minutes until soft. 
Figure 1: Blanching the cabbage leaves in boiling water, trimming the stem, and rolling the stuffed leaf.

If you're using eggplant and tomatoes, cut off the top and then remove the insides to create space for the filling. Save the tops and set aside. They will be replaced after stuffing.

Filling preparation
  • Mix all the filling ingredients by hand 
  • Add 1/2 cup of water and then mix again by hand
  • Next, if using peppers, eggplant, or tomatoes, add the filling to the hollowed interior. If using cabbage or collards, roll the filling as shown in Figure 2.
Figure 2: Stuffing the vegetables.

Stock preparation
  • Sauté chopped onions in olive oil in a large pot
  • Add 1/2 cup of chopped tomatoes
  • Add 1 tsp tomato paste (optional)
  • Simmer the contents for 3 minutes and then add stuffed vegetables (Figure 3).
  • Add boiled water or chicken broth to just barely cover the stuffed vegetables.
  • Add salt to taste and cover the pot. Let it come to a boil and then simmer until rice is cooked, about 30-40 minutes. 
Figure 3: Placing stuffed vegetables in the pot. 

Finally, the dish is complete. We served it with fresh cucumber salad and bread. Enjoy!


Thursday, February 7, 2013

Corky and Lenny's

Every time we travel to Cleveland, OH, we must make a stop at Corky and Lenny's! It is a great New York Style Deli for those who have never been there. They have a great variety on their menu including amazing deserts! Since most of the time we stop there for lunch, our favorite dishes to order are the corned beef sandwich and matzoh ball soup. Once I tried their blintzes, which are similar to crepes stuffed with cheese filling. They came with a side of cream cheese and blueberry sauce. I would definitely order them again. We never leave Corky and Lenny's without ordering something to go. We love to bring back corned beef, beef sticks, and pickles. Sometimes, I end up getting their HUMONGOUS eclairs!  The image on the bottom right corner shows the delicious sandwich that we made using corned beef and rye bread with fresh tomatoes on the side.